
- Overview
- Core Theme
- Recommended Difficulty
- Team Rule: Stay Together
- Stratagem Rules
- Reinforcements
- Scavenging Rules
- Minimap & Starting Position
- Starting Loadout
- Progression System
- Unlock Rules
- Tracking Unlocks
- Failure and Gear Lockout Rules
- Progression Example
- Armor Rules
- Booster Rules
- Primary Weapon Rules
- Banned Primary Weapons
- Secondary Weapon Rules
- Throwable Rules
- Recommended Enemy Type
- Optional Campaign Format
- Why This Ruleset Works
- Final Thoughts
Overview
Helldivers 2 is usually a game about overwhelming firepower, orbital support, airstrikes, sentries, support weapons, and calling down enough managed democracy to vaporize anything that moves.
This ruleset does the opposite.
The Survival Horror Ruleset is designed to turn Helldivers 2 into a grounded zombie survival experience inspired by games and movies like Left 4 Dead, Resident Evil, Zombieland, and other classic survival horror setups.
Here is a video demonstration using a difficulty 3 mission for solo play if you prefer to watch instead of read: https://youtu.be/ULivUxFq-IA
Instead of playing like elite super-soldiers with endless military support, the goal is to play like a desperate survivor group trapped in a hostile outbreak zone.
That means:
- Limited gear
- No normal stratagem support
- Careful ammo management
- Team movement
- Resource scavenging
- Limited information
- Real extraction pressure
- Punishing failure
- Slow progression through successful survival
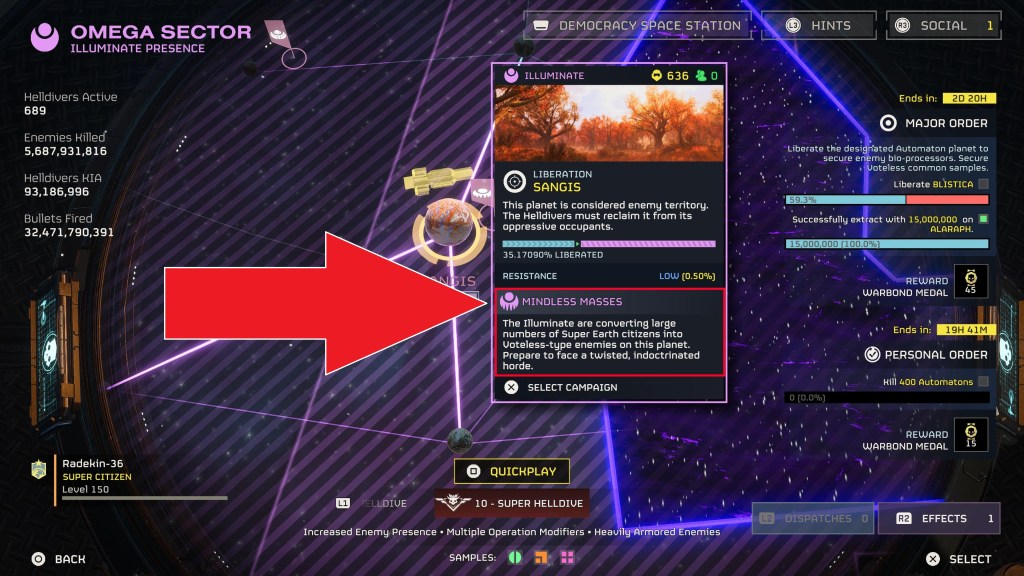
This ruleset is built specifically for Illuminate Mindless Masses operations, because those missions already have the closest feel to a zombie horde mode in Helldivers 2.
The result is simple:
You are not dropping in as an unstoppable Helldiver death machine.
You are trying to survive the apocalypse.
Core Theme
The goal is to make Helldivers 2 feel more like a classic zombie survival horror game.
The main inspirations are:
- Left 4 Dead
- Resident Evil
- Zombieland
- Classic zombie movies
- Classic survival horror games
The gameplay focus should be:
- Scavenging
- Ammo conservation
- Mobility
- Panic management
- Teamwork
- Survival
- Extraction
This is not about playing optimally in the normal Helldivers 2 sense.
It is about creating tension.
It is about forcing uncomfortable decisions.
It is about making every magazine, every reload, every teammate, and every extraction matter.
Recommended Difficulty
This mode is designed to play at Difficulty 3 for the best enemy mix of voteless hordes, fleshmobs, and the least number of Overseers and Harvesters. Difficulty 4 begins mixing in more Harvesters and Watchers, which is still a lot of fun, but shifts more towards a War of the Worlds style horror. Still quite fun, but good to know what gameplay to expect.
Players may start at any difficulty, if there 2 or more players depending on their experience level and how brutal they want the challenge to be.
Recommended starting point for solo players: Difficulty 1
Recommended for 2+ players: Difficulty 3
The point is not simply to make the game as hard as possible. The point is to create a survival horror experience where the team has enough pressure to feel threatened, but not so much chaos that the ruleset instantly collapses into nonsense.
Start lower, get a feel for it, try it on different mission types, then raise the difficulty if you want to branch out.
Team Rule: Stay Together
If playing with a squad, the team must stay together at all times.
No splitting up.
That means no:
- Solo roaming
- Two-by-two splits
- Three-plus-one splits
- Sending one player off to loot
- Sending one player off to solo objectives
- Wandering around the map like four unrelated idiots
The squad functions as one survivor group.
This matters for two reasons.
First, it reinforces the zombie survival fantasy. In most survival horror stories, splitting up is how people get killed. This ruleset should feel the same way.
Second, it helps preserve the intended horde pressure. In Helldivers 2, splitting up can affect spawning behavior and make the experience feel less like a concentrated zombie swarm. The goal here is not to game the spawn system. The goal is to create a consistent survival-horde experience.
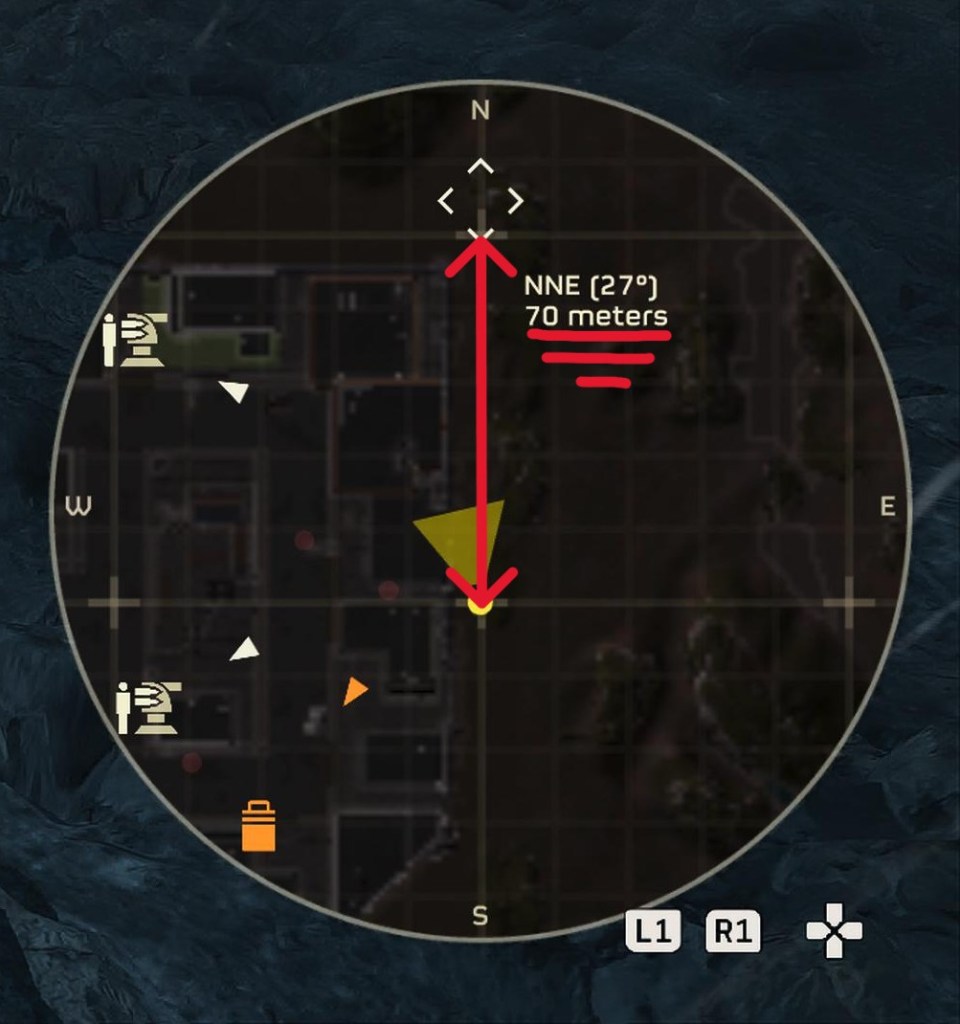
Practically speaking, try to keep everyone within one of the map grid square zones. That’s roughly 70m X 70m.
Stay together.
Move together.
Loot together.
Panic together.
Extract together.
Stratagem Rules
No normal stratagems are allowed.
That means no calling down your usual comfort picks.
No orbital strikes.
No Eagle airstrikes.
No support weapon call-ins.
No sentry call-ins.
No shield backpack call-ins.
No emergency “oops, I solved the problem” buttons.
The only stratagem-related exceptions are:
- Hellbombs
- Objective-required equipment
- SEAF Artillery
If the mission requires something to complete the objective, you may use it.
If the map provides SEAF Artillery, you may use it.
But your personal stratagem loadout should not be used even though technically we cannot launch a mission without selecting a full array of stratagems.
Reinforcements
Oh, and Reinforcements may only be called at a Point of Interest.
This is to encourage teamwork, punish reckless behavior, and to mimic the way Left4dead would respawn players by “finding” a new survivor trapped in a closet.
In keeping with that theme, the reinforcing player should try to land as close the blue reinforcement beacon as possible.
Scavenging Rules
Anything naturally found on the map is fair game.
You may use:
- SEAF Artillery
- Found support weapons
- Found backpacks
- Emplacement weapons
- Ammo boxes
- Environmental pickups (e.g., exploding barrels)
- Vehicles
- Other naturally occurring map resources
The rule is simple:
If you find it in the world, it is fair game.
There is one major exception:
The Arc Thrower may not be used, even if found on the map.
The Arc Thrower is simply too strong for this ruleset. It trivializes zombie hordes, removes too much of the pressure, and turns the experience back into normal Helldivers problem-solving instead of survival horror.
The point of scavenging is to create desperation and adaptation, not to instantly find one tool that deletes the entire horde fantasy.
Found a machine gun? Great.
Found a backpack? Good.
Found a vehicle? Huge.
Found an Arc Thrower?
Leave it on the ground.
Minimap & Starting Position
Players should always try to select a starting position on the map that is near the edge of the arena and inside or adjacent to a city section. The idea is to mimic classic zombie tropes of arriving on the edge of town or starting as a survivor in an apartment complex.
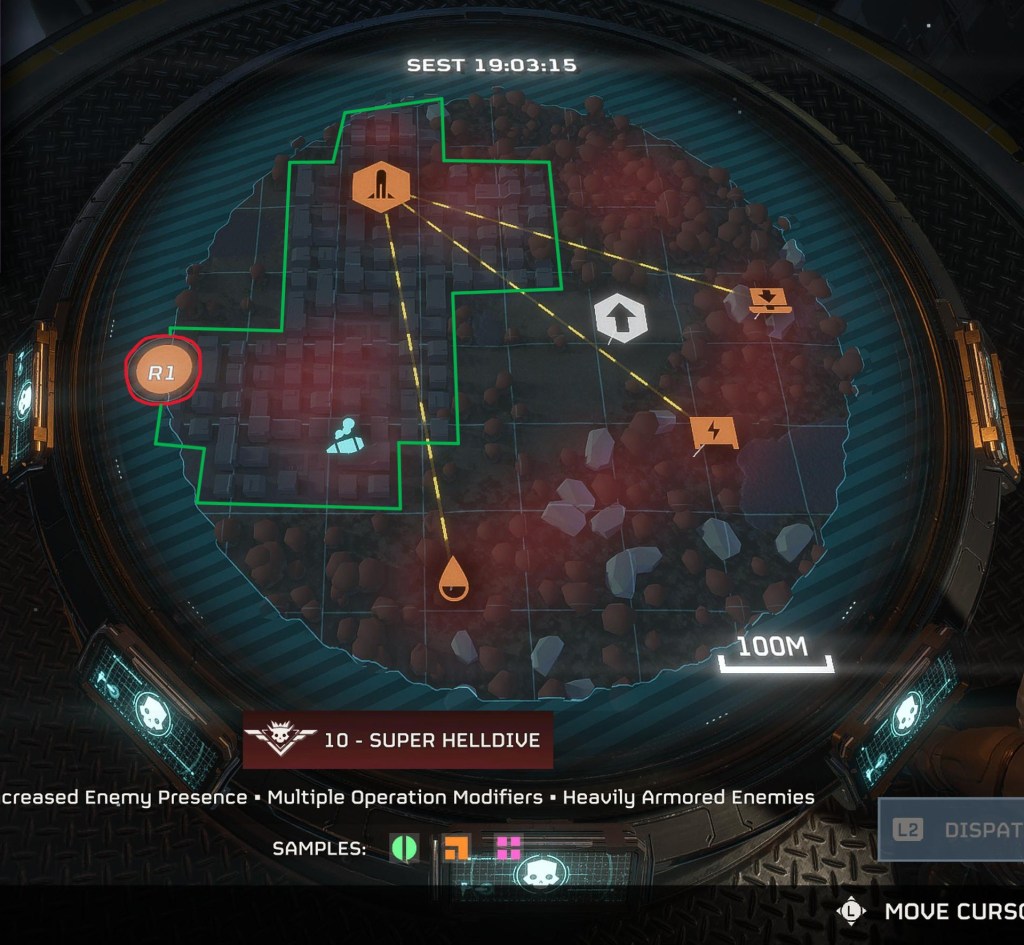
The minimap may only be used for placing map pins and basic team navigation while remaining zoomed out to the maximum possible.
Players should not actively use the map to:
- Identify enemy positions
- Search for points of interest (unless Lidar enabled)
- Hunt for side objectives
- And so on
The goal is to mimic a more classic survival horror experience with limited information.
You are supposed to feel uncertain.
You are supposed to move through the map with incomplete awareness.
You are supposed to discover danger by encountering it, not by calmly reading the map like a tactical operations officer.
Using map pins to establish a general destination is fine.
Using the ping system to highlight enemies, objectives, and so on is also fine.
Using the minimap as a full information tool is not.
For extra immersion, try turning off various HUD elements or switching them to Map Only mode to make it more difficult to track things like your health, weapons, and ammo unless you deliberately check them.
Starting Loadout
For the first mission a player starts or joins, they must use the default survivor loadout.

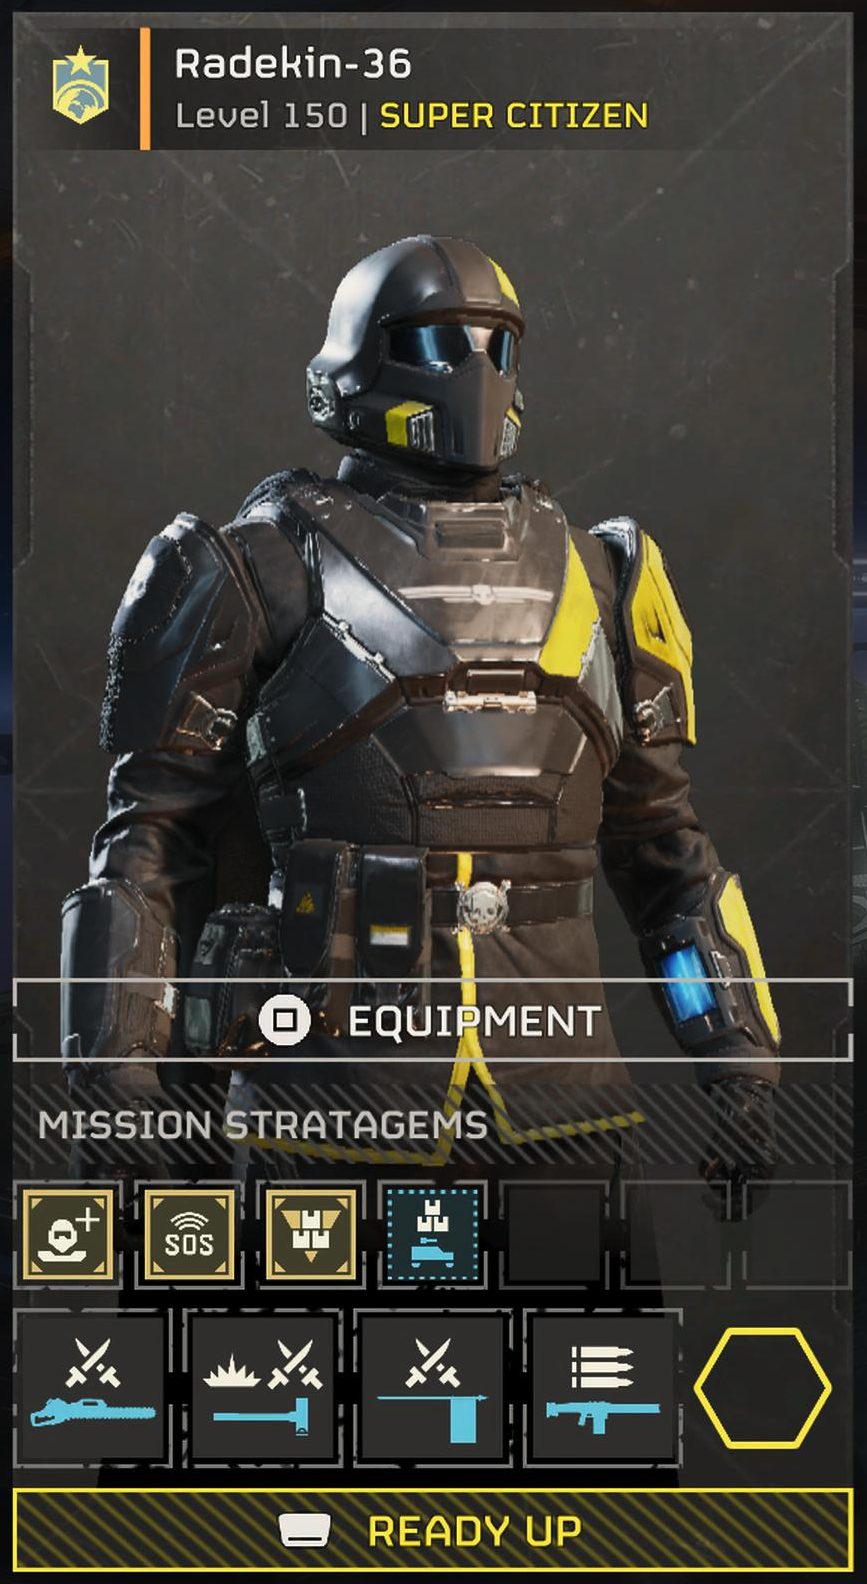
Armor
B-01 Tactical
Primary Weapon
AR-23 Liberator
Secondary Weapon
P-2 Peacemaker
Throwable
G-12 High Explosive
Booster
No booster may be used during the first mission.
Primary Weapon Customization
No primary weapon customization options may be used during the first mission.
This is your “ordinary survivor with basic equipment” starting point.
No fancy tricks.
No optimized kit.
No special toys.
Just a rifle, a pistol, basic grenades, and whatever survival instincts you brought with you.
Progression System
Progression is earned through survival.
A player only earns progression if both of the following conditions are met:
- The mission is successfully completed.
- The player successfully extracts alive.
Both conditions matter.
Completing the mission but failing to extract does not count.
Extracting from a failed mission does not count.
You have to complete the mission and get out alive.
That is the whole point.
Unlock Rules
After each successful mission completion and successful extraction, the player may unlock one individual item from the allowed equipment lists.
This is an item-by-item unlock system.
You do not unlock an entire category.
You do not unlock all primary weapons.
You do not unlock all armor.
You do not unlock all boosters.
You unlock one specific item at a time.
After each successful mission completion and extraction, the player may choose one allowed item from one of the following types:
- Primary weapon
- Secondary weapon
- Throwable
- Armor Set
- Booster
That specific item is then available for the remainder of the run, unless temporarily restricted by the failure rules below.
For example, after one successful mission, a player might unlock:
- M90A Shotgun
But they only get one choice per successful mission.
Primary Weapon Customization
Weapon customization for an individual weapon is allowed after completing a full single set of missions within an Operation with that weapon.
This creates more pressure in the progression system because every unlock matters. You are not just choosing a category and opening up a giant menu of options. You are choosing one survival tool at a time.
This naturally lends itself to more teamwork and coordination from the very beginning.
Choose carefully.
Tracking Unlocks
Because progression is now item-by-item, players should track their unlocks somewhere.
Recommended tracking methods:
- A piece of paper
- A notebook
- A phone note
- A Word document
- A Google Doc
- A simple checklist
- A Discord message or pinned post for the squad
Each player should track their own unlocked gear.
Example format:
Player Unlock Tracker
Armor Unlocked:
- B-01 Tactical
- [Unlocked armor here]
Primary Weapons Unlocked:
- AR-23 Liberator
- [Unlocked primary here]
Secondary Weapons Unlocked:
- P-2 Peacemaker
- [Unlocked secondary here]
Throwables Unlocked:
- G-12 High Explosive
- [Unlocked throwable here]
Boosters Unlocked:
- [Unlocked booster here]
The default starter gear does not need to be earned. It is always the fallback kit.
Everything beyond the starter kit must be earned through successful missions and successful extractions.
Failure and Gear Lockout Rules
Failure does not always reset the entire run, but it does punish bad outcomes.
A player does not gain a new unlock if either of the following happens:
- The mission fails.
- The player fails to extract.
If the mission fails, even if the player extracts, the player does not earn progression. This applies to the entire squad.
If the player fails to extract, even if the mission succeeds, the player does not earn progression. This applies to the individual player, not the entire squad.
In addition, if a player fails to extract, whatever gear they were using during that mission becomes temporarily unavailable. This applies to the individual player that failed to extract.
That gear cannot be selected again until the player successfully completes and extracts from a subsequent mission.
This applies to the gear the player brought into that failed extraction attempt, including:
- Armor
- Primary weapon
- Secondary weapon
- Throwable
- Booster
If a player does not have enough unlocked alternatives available, they fall back to the default starter loadout as needed.
For example, if a player fails to extract while using an unlocked shotgun, unlocked pistol, unlocked armor set, and unlocked booster, those specific items are temporarily unavailable.
If they have other unlocked options, they may use those.
If they do not, they fall back to the default starter loadout wherever necessary.
Once that player successfully completes and extracts from a later mission, the temporarily locked gear becomes available again.
This keeps failure meaningful without forcing a full progression wipe every time.
You are not necessarily losing the entire campaign.
But you are losing access to the equipment you failed to bring home.
Progression Example
Here is what progression might look like across several missions.
Mission 1
The player starts with:
- B-01 Tactical
- AR-23 Liberator
- P-2 Peacemaker
- G-12 High Explosive
- No booster
The mission succeeds and the player extracts.
The player unlocks one item.
Example unlock:
- Stamina Enhancement
Mission 2
The player now has access to:
- B-01 Tactical
- AR-23 Liberator
- P-2 Peacemaker
- G-12 High Explosive
- Stamina Enhancement
The mission succeeds and the player extracts.
The player unlocks one more item.
Example unlock:
- A specific allowed shotgun
Mission 3
The player now has access to the starter kit, Stamina Enhancement, and that specific shotgun.
The player brings the shotgun and Stamina Enhancement.
The mission succeeds, but the player fails to extract.
The player earns no new unlock.
The shotgun and Stamina Enhancement are temporarily unavailable until the player completes and extracts from a future mission.
If the player has no other unlocked primary weapon or booster, they fall back to:
- AR-23 Liberator
- No booster
Mission 4
The player uses the fallback kit.
The mission succeeds and the player extracts.
The temporarily locked shotgun and Stamina Enhancement become available again.
The player also earns one new unlock for the successful completion and extraction.
That is the loop.
Survive, extract, unlock.
Fail to extract, lose access to what you failed to bring home.
Armor Rules
Any armor is allowed except armor with stealth-oriented passives.
Banned armor passives:
- Reduced Signature
- Scout
- Feet First
The goal is to avoid turning this into a stealth game.
This is not about sneaking around the outbreak, but you can choose to sneak around sometimes – just not with armor perks that make it too easy.
This is about surviving the horde.
Armor choice should support the survival fantasy without undermining the pressure of being hunted, surrounded, and forced to fight through swarms.
Booster Rules
The following boosters are allowed:
- Vitality Enhancement
- Stamina Enhancement
- Muscle Enhancement
- Hellpod Space Optimization
- Motivational Shocks
- Experimental Infusion
- Expert Extraction Pilot
- Sample Scanner
- Dead Sprint
- Sample Extricator
All other boosters are banned.
Boosters must still be unlocked through the progression system before they can be used.
The expanded booster list gives players more long-term progression options while still preserving the survival horror theme.
Some boosters improve survivability.
Some improve mobility.
Some improve extraction pressure.
Some support scavenging and resource awareness.
But because each booster must be unlocked individually, choosing one still comes at a cost.
Do you want better stamina?
Better extraction?
Better survivability?
Better panic movement?
You only get one unlock at a time, so choose carefully.
Primary Weapon Rules
Any “grounded” projectile firearm is allowed.
The goal is traditional-style weaponry.
You are looking for weapons that feel like something that belongs in a classic zombie survival scenario: rifles, shotguns, SMGs, and other conventional firearms.
Banned weapon categories include:
- Elemental weapons
- Explosive weapons
- Energy weapons
- Crowd-control gimmick weapons
- Overly sci-fi weapons
- Special-effect weapons
The goal is not perfect realism. Helldivers 2 is still Helldivers 2.
The goal is tone.
If the weapon feels too futuristic, too magical, too explosive, too gimmicky, or too far removed from classic zombie survival weaponry, it is out.
Banned Primary Weapons
The following primary weapons are banned:
- Liberator Concussive
- AR-32 Pacifier
- AR-2 Coyote
- SMG-72 Pummeler
- SG-20 Halt
- SG-451 Cookout
- SG-225IE Breaker Incendiary
- SMG-34 Stoker
- CB-9 Exploding Crossbow
- R-36 Eruptor
- All LAS weapons
- All PLAS weapons
- Variable
- Torcher
- Dominator
These weapons are banned because they either lean too far into sci-fi effects, explosive damage, elemental effects, crowd-control gimmicks, or special weapon behavior that breaks the intended survival horror feel.
Secondary Weapon Rules
Any secondary weapon is allowed except the banned options listed below.
Banned secondary weapons:
- P-33 Missile Pistol
- P-35 Re-Educator
- P-72 Crisper
- LAS-58 Talon
- GP-31 Grenade Pistol
- LAS-7 Dagger
- GP-20 Ultimatum
- PLAS-15 Loyalist
All melee weapons are allowed.
The goal is classic-style weaponry.
Pistols and melee weapons fit the survival horror feel. Pocket rocket launchers, energy pistols, grenade pistols, and sci-fi sidearms do not.
Throwable Rules
All standard throwables are allowed.
Among special throwables, only the following are allowed:
- Giga Grenade
- Impact Grenade
- Incendiary Impact Grenade
- Throwing Knife
Everything else is banned.
Grenades should feel like meaningful high-value tools, not a way to turn the game back into normal Helldivers 2 chaos.
Plus, you will still need them to destroy Warp Ships. Use them carefully.
Waste them and you may regret it later.
Recommended Enemy Type
This ruleset is designed specifically for:
- Illuminate
- Mindless Masses operations
That enemy type gives the closest feel to a zombie survival mode. Be aware that Crescent Overseers and Harvesters start showing up around difficulty 4, which is a little bit beyond classic zombie horror, but still function well enough as survival horror elements given the restrictions.
The horde pressure, the movement, the overwhelming numbers, and the way fights can spiral out of control all fit the intended experience.
The goal is not just to fight enemies.
The goal is to feel like ordinary people trapped in a zombie apocalypse, trying to reach the objective and escape before the horde consumes them.
Optional Campaign Format
For a more structured experience, treat each operation like a survival campaign.
Mission 1: Outbreak
Start with the default loadout.
No booster.
No customization.
Survive with the basics.
Mission 2: Scavengers
After one successful mission and extraction, each surviving player unlocks one specific item.
The squad starts to specialize.
Mission 3: Desperation
The team has more options, but every failed extraction creates more pain because the gear used on that failed run becomes temporarily unavailable.
Mistakes matter more.
Mission 4 and Beyond: Established Survivors
The team gradually builds a larger pool of allowed equipment.
Each successful mission adds one more tool.
Each failed extraction removes access to the gear that player failed to bring home until they successfully complete and extract from another mission.
The squad becomes stronger over time, but never fully escapes the pressure.
That is the point.
Why This Ruleset Works
Helldivers 2 is already great at chaos.
This ruleset adds restraint.
By removing normal stratagem access, limiting weapon choices, restricting map information, forcing team cohesion, and adding item-by-item progression with gear lockout penalties, the game becomes less about overpowering the enemy and more about surviving the mission.
You have to think differently.
You have to value ammo.
You have to stay close.
You have to decide when to fight and when to move.
You have to accept that you will not always know what is around the corner.
You have to treat extraction as part of the mission, not just the cutscene after the mission.
That is what makes the ruleset work.
It changes the emotional texture of the game.
Normal Helldivers 2 says:
“Call in the answer.”
This ruleset says:
“You better hope you brought enough bullets.”
Final Thoughts
The Helldivers 2 Survival Horror Ruleset is meant to be flexible, but the core idea should stay intact:
You are not playing as overpowered sci-fi soldiers with endless support.
You are playing as a survivor group trying to make it through a zombie apocalypse.
Stay together.
Conserve ammo.
Use limited information.
Scavenge what you can.
Leave the Arc Thrower on the ground.
Complete the objective.
Extract alive.
And if you fail, accept the consequences.
That is the game.
Modify the rules however your squad wants after you get a feel for the experience, but do not soften it too much right away. The tension is the point.
The panic is the point.
The desperate sprint to extraction with half a magazine and a swarm behind you is the point.
Survive the horde.
Or lose what you failed to bring home.
For Super Earth.
Radekin-36

Leave a comment